Would your frontend application benefit from having access to updated data in real-time, but you can't seem to find a 'serverless' way to do it? Well, that was me 3 months ago.
I had a goal to make a serverless chat app, but no clue how I would implement real-time communication between my backend and the frontend client. If you search AWS for 'websockets serverless' you will unfortunately find nothing (at least at the time of writing this article).
So how did I do it? Read on, my friends!
(Or, just check out the repository to see what I've done.)
Some background
Before we dive into the real-time updates, I’d like to explain how I've structured my application in general. This is a (very) rudimentary diagram I've created to show how the whole app fits together.
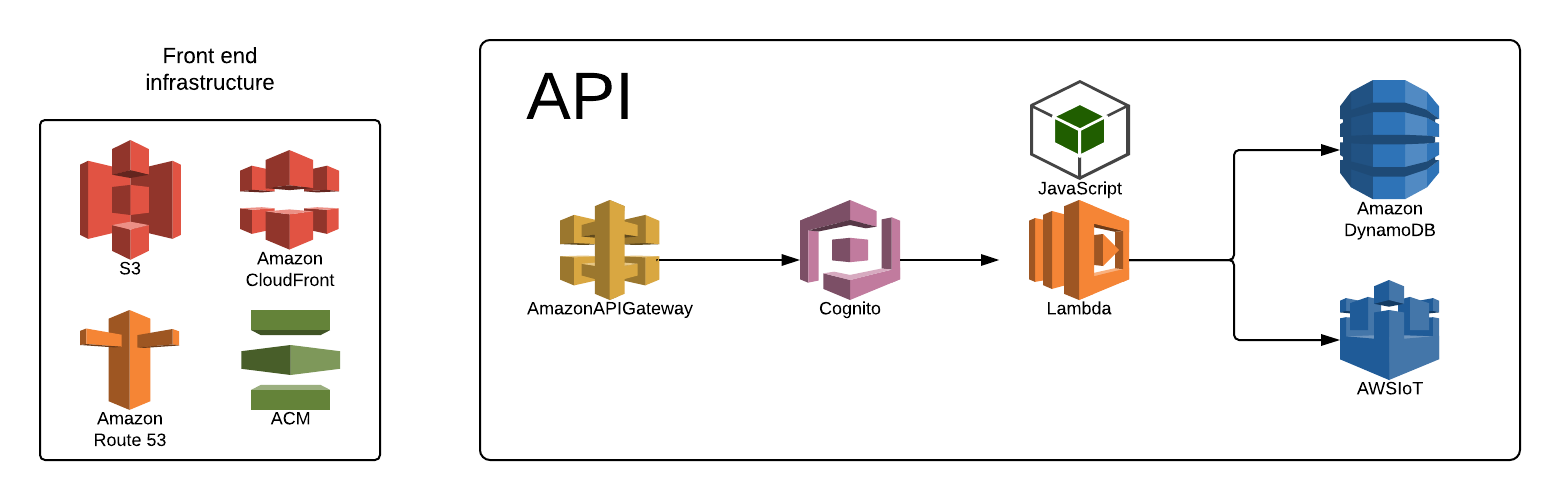
The frontend is hosted in an S3 bucket as a static site.
I'm using VueJS for my frontend framework. That bucket is behind a CloudFront distribution with an SSL certificate from Amazon Certificate Manager, and my Route53 domain points awschat.net (my app) to that distribution.
The backend is your standard serverless API.
API Gateway routes incoming requests to specific Lambdas, which then access DynamoDB and the IoT message broker. (We'll dive more into that later.) I also use a Cognito User Pool authorizer to ensure that all of my requests are coming from users of my application. I'll dive more into that in the next section.
Note: If you want to check out the finished version of my application before reading on, head over to https://awschat.net
Setting up Cognito
To set up Cognito User Pools with your API and frontend authentication, you’ll need a bit of CloudFormation.
Here are the Cognito-related entries in the resources section of my serverless.yml:
CognitoUserPoolMyUserPool:
  Type: "AWS::Cognito::UserPool"
  Properties:
    AdminCreateUserConfig:
      AllowAdminCreateUserOnly: False
    AliasAttributes:
      - email
    AutoVerifiedAttributes:
      - email
    Policies:
      PasswordPolicy:
        MinimumLength: 8
        RequireLowercase: false
        RequireNumbers: false
        RequireSymbols: false
        RequireUppercase: false
    UserPoolName: MY_USER_POOL_NAME
    Schema:
      - Name: email
        AttributeDataType: String
        DeveloperOnlyAttribute: false
        Mutable: true
        Required: true
WebAppUserPoolWebClient:
  Type: "AWS::Cognito::UserPoolClient"
  Properties:
    ClientName: Web
    GenerateSecret: false
    ReadAttributes:
      - "email"
    UserPoolId:
      Ref: CognitoUserPoolMyUserPool
    WriteAttributes:
      - "email"
ApiGatewayAuthorizer:
  Type: "AWS::ApiGateway::Authorizer"
  Properties:
    Name: UserPool
    ProviderARNs:
      - 'Fn::GetAtt': [ CognitoUserPoolMyUserPool, Arn ]
    RestApiId:
      Ref: ApiGatewayRestApi
    IdentitySource: "method.request.header.Authorization"
    Type: COGNITO_USER_POOLS
One thing to note is: when you want to add a Cognito User Pool Authorizer to an endpoint, the Serverless Framework doesn’t support using a user pool that gets created in the same stack.
That means we have to define every endpoint-authorizer attachment manually in CloudFormation, like this:
 ApiGatewayMethodUserGet:
  Type: "AWS::ApiGateway::Method"
  Properties:
    AuthorizationType: COGNITO_USER_POOLS
    AuthorizerId:
      Ref: ApiGatewayAuthorizer
We also have to use the normalized name of our API Gateway method. (Check here for normalized names of serverless-created resources.)
Setting up the IoT message broker configuration
Step 1: AWS
This part is a little bit more complex. In order to allow a front end user to use our message broker, we first have to set up an Identity Pool that our users can authenticate with.
Note that, in my application, I've left privileges a little more loose than they should be in a serious production app. In fact, I technically leave all IoT users unauthenticated. This is because adding logged-in credentials is a bit more complex.
But—I only give them permission to subscribe, receive, and connect. So no one can maliciously send a bunch of messages from their client.
The CloudFormation to set that up is right here:
WebAppCognitoIdentityPool:
  Type: "AWS::Cognito::IdentityPool"
  Properties:
    IdentityPoolName: NAME_OF_IDENTITY_POOL
    AllowUnauthenticatedIdentities: true
    CognitoIdentityProviders:
      - ProviderName:
          'Fn::GetAtt': [ CognitoUserPoolMyUserPool, ProviderName ]
        ClientId:
          Ref: WebAppUserPoolWebClient
cognitoAuthRole:
  Type: 'AWS::IAM::Role'
  Properties:
    RoleName: NAME_OF_IDENTITY_POOL_Auth_Role
    AssumeRolePolicyDocument:
      Version: '2012-10-17'
      Statement:
        - Effect: Allow
          Principal:
            Federated: cognito-identity.amazonaws.com
          Action: [ 'sts:AssumeRoleWithWebIdentity' ]
          Condition:
            StringEquals:
              'cognito-identity.amazonaws.com:aud':
                Ref: WebAppCognitoIdentityPool
            'ForAnyValue:StringLike':
                'cognito-identity.amazonaws.com:amr': authenticated
    Policies:
      - PolicyName: cognitoauth
        PolicyDocument:
          Version: '2012-10-17'
          Statement:
            - Effect: Allow
              Action:
              - 'iot:DescribeEndpoint'
              - 'iot:Receive'
              - 'iot:Subscribe',
              - 'iot:GetTopicRule'
              - 'iot:Connect'
              - 'mobileanalytics:PutEvents',
              - 'iot:DescribeCertificate',
              - 'cognito-sync:*',
              - 'iot:GetPolicyVersion'
              Resource:
              - "*"
cognitoUnauthRole:
  Type: 'AWS::IAM::Role'
  Properties:
    RoleName: NAME_OF_IDENTITY_POOL_Unauth_Role
    AssumeRolePolicyDocument:
      Version: '2012-10-17'
      Statement:
        - Effect: Allow
          Principal:
            Federated: cognito-identity.amazonaws.com
          Action: [ 'sts:AssumeRoleWithWebIdentity' ]
          Condition:
            StringEquals:
              'cognito-identity.amazonaws.com:aud':
                Ref: WebAppCognitoIdentityPool
            'ForAnyValue:StringLike':
                'cognito-identity.amazonaws.com:amr': unauthenticated
    Policies:
      - PolicyName: cognitounauth
        PolicyDocument:
          Version: '2012-10-17'
          Statement:
            - Effect: Allow
              Action:
              - 'iot:DescribeEndpoint'
              - 'iot:Receive'
              - 'iot:Subscribe',
              - 'iot:GetTopicRule'
              - 'iot:Connect'
              - 'mobileanalytics:PutEvents',
              - 'iot:DescribeCertificate',
              - 'iot:Publish',
              - 'cognito-sync:*',
              - 'iot:GetPolicyVersion'
              Resource:
              - "*"
myApiIdentityPoolRoleAttachment:
  DependsOn: [ WebAppCognitoIdentityPool, cognitoUnauthRole, cognitoAuthRole ]
  Type: "AWS::Cognito::IdentityPoolRoleAttachment"
  Properties:
    IdentityPoolId:
      Ref: WebAppCognitoIdentityPool
    Roles:
      unauthenticated:
        'Fn::GetAtt': [ cognitoUnauthRole, Arn ]
      authenticated:
        'Fn::GetAtt': [ cognitoAuthRole, Arn]
We will also need to add a policy to IoT that allows all actions to be executed.
To change your IoT policy, you must go to the IoT console and click 'Get started'. From there, click 'Secure' on the left side menu, and then 'Policies'.
You will want to create a new policy that looks like the one below:
{
  "Version": "2012-10-17",
  "Statement": [
    {
      "Effect": "Allow",
      "Action": [
        "iot:*"
      ],
      "Resource": [
        "*"
      ]
    }
  ]
}
Note: Again, this is probably too broad of a policy for a production application. You can narrow it down once you've established your application's IoT access patterns.
Step 2: Accessing IoT from Lambda
Say a user sends an API request to add a message to a chat. We update our database, and then return the message to the user who sent it, but how do we notify the other user that a message has been added?
That's where the AWS SDK comes in. My example uses the JavaScript SDK.
You’ll need to get your IoT endpoint, which you can do by running aws iot describe-endpoint in your console if you have the AWS CLI. Or you can find it by going to the IoT console, clicking 'getting started' and then clicking on 'settings' in the bottom left corner.
const AWS = require('aws-sdk');
const iotData = new AWS.IotData({endpoint: 'YOUR_IOT_ENDPOINT HERE'});

exports.handler = (event, context, callback) => {
  const iotParams = {
    payload: JSON.stringify({ message: 'Hello!'})
    topic: `/my-app/${event.receiverId}`
  }

  iotData.publish(iotParams, (err, data) => {
    if (err) {
      // handle error here
    }
    callback(null, { success: true })
  })
}
The example Lambda above takes in a user id (event.receiverId) and broadcasts to that user's channel in our app. We have a prefix in our topic, my-app/ which will let us use the same IoT endpoint for multiple applications.
The last thing we need to do is set up our frontend application to use the IoT message broker so that we can actually receive the publish event.
Step 3: Connecting in your front end
Luckily, someone has already come up with a library that lets us listen to the IoT mqtt broker over Websockets! You can find it here.
Here is an example of how to use it in a webpack build (taken from the library mentioned above):
import AWS from 'aws-sdk/global'
import AWSMqtt from 'aws-mqtt'
AWS.config.region = 'us-east-1' // your region
AWS.config.credentials = new AWS.CognitoIdentityCredentials({
  IdentityPoolId: '...' // your identity pool id
})

const client = AWSMqtt.connect({
  WebSocket: window.WebSocket,
  region: AWS.config.region,
  credentials: AWS.config.credentials,
  endpoint: '...iot.us-east-1.amazonaws.com', // NOTE: get this value with `aws iot describe-endpoint`
  clientId: 'mqtt-client-' + (Math.floor((Math.random() * 100000) + 1)), // clientId to register with MQTT broker. Need to be unique per client
})

client.on('connect', () => {
  client.subscribe('/myTopic')
})
client.on('message', (topic, message) => {
  // this is where you will handle the messages you send from Lambda
  console.log(topic, message)
})
client.on('close', () => {
  // ...
})
client.on('offline', () => {
  // ...
})
Conclusion
That's it! Now you know how to implement real-time communication between your frontend application and serverless backend.
The source code for the entire project can be found here: