One of the great things about the Serverless Framework is that it can be used with multiple providers. We're up to seven (!) different providers with more on the way.
Today, I'm going to explore creating a project with Google Cloud Functions. Google has some great surrounding services in their cloud platform, so I'm excited to see the future of how they integrate their Serverless offerings.
In this post, we'll deploy a simple HTTP endpoint to GCF to understand the development model. Then, we'll take it up a notch by using the Google Vision API to inspect images that we pass in. Finally, I'll cover what I'm excited about with Google Cloud Functions and what's needed in the future.
Let's dive in!
Getting started with a Google Cloud account
Before we go anywhere, we'll need to get our account and credentials set up. If you've already done this, you can skip to Deploying a Simple Function.
First, you'll need to sign up for a Google Cloud Billing Account. Follow the prompts, including entering your billing information.
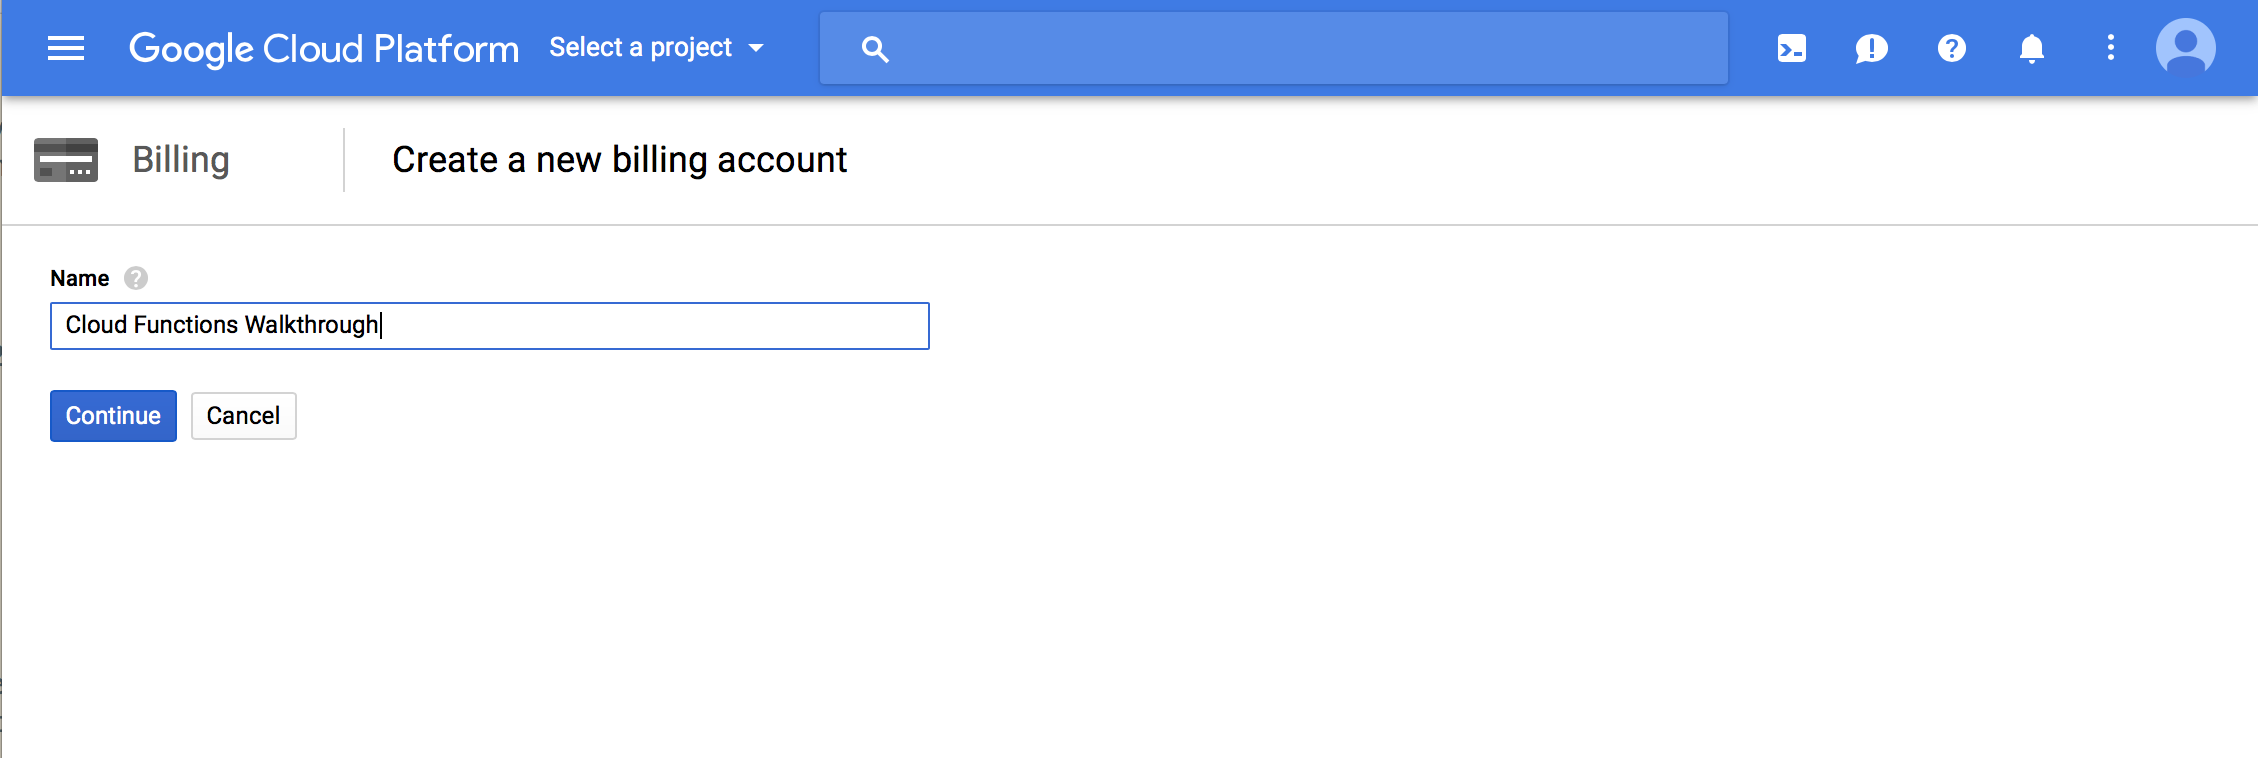
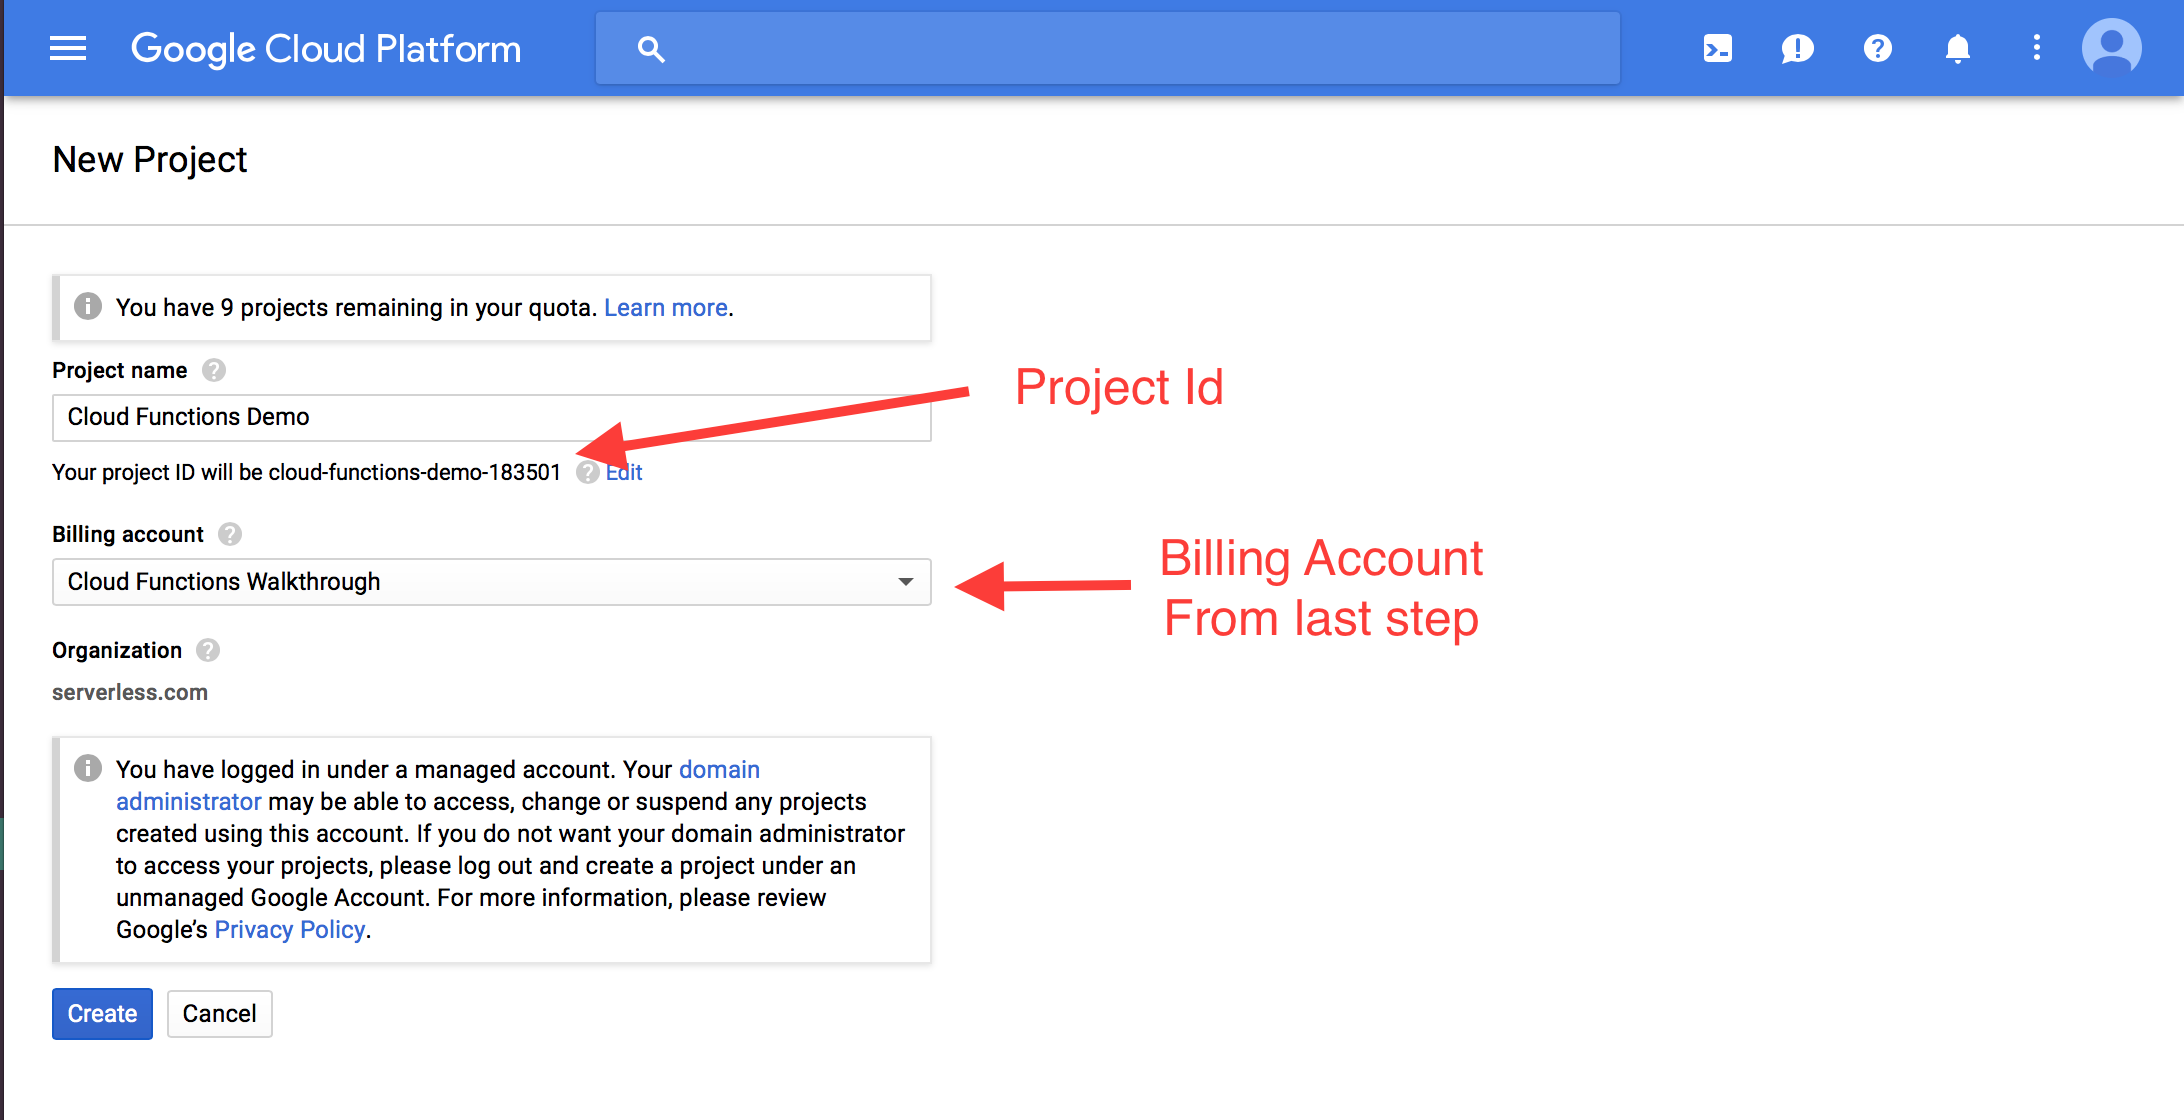
Next, you'll need to create a new project. Make sure you use the Billing Account created in the previous step as your Billing Account for this project. Also, take note of the Project Id which is listed on this screen.
Once you have your project, you'll need to enable the required APIs. Navigate to the API Dashboard, and click the link to Enable APIs and Services.
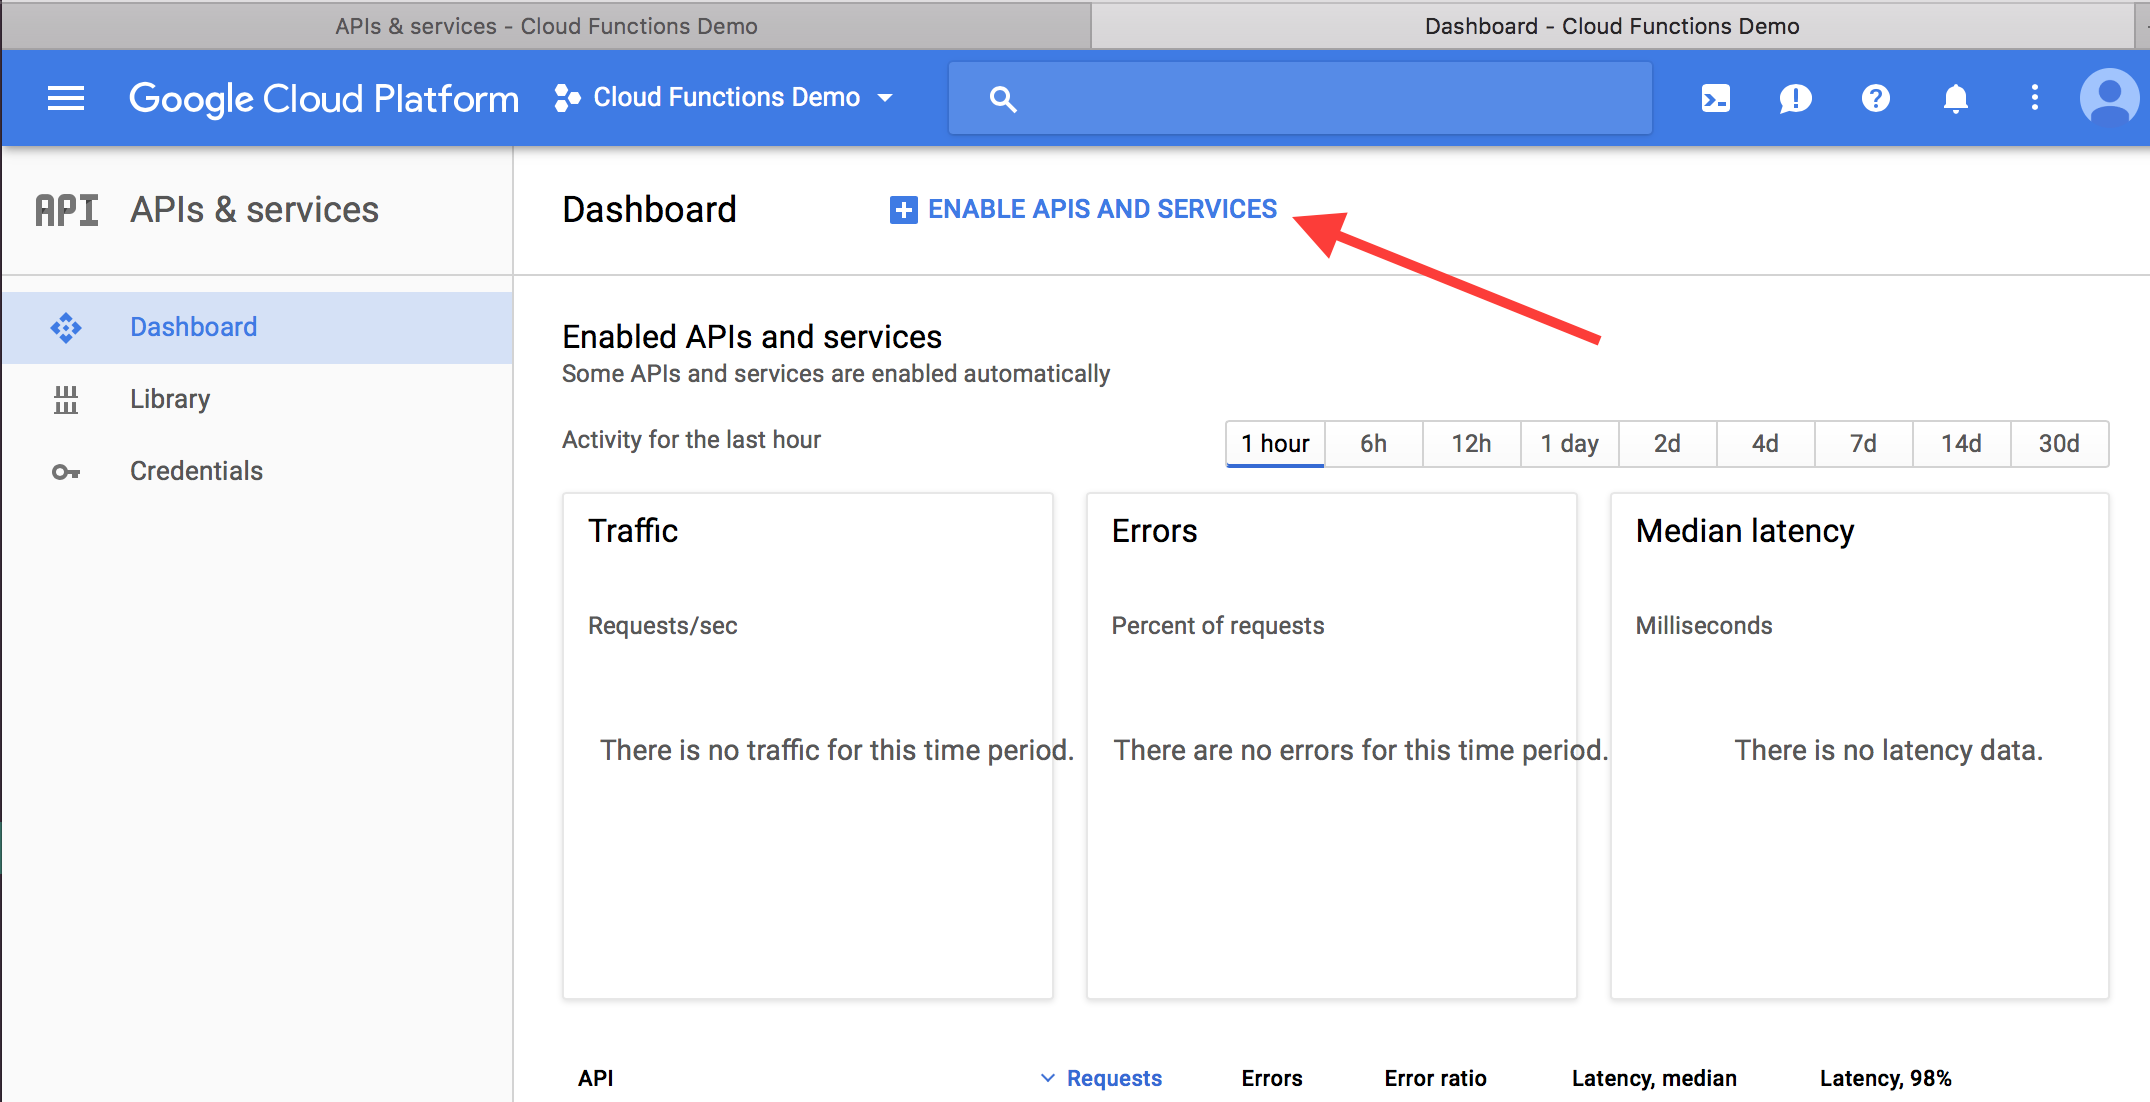
Search for "Google Cloud Functions", and click on the Google Cloud Functions API. Click Enable to enable it for your project. Then, do the same for the "Google Cloud Deployment Manager" API.
Last step, we need to grab some credentials. Go to the Credentials page in the API Dashboard. Click the "Create credentials" button, and choose the "Service Account Key" option.
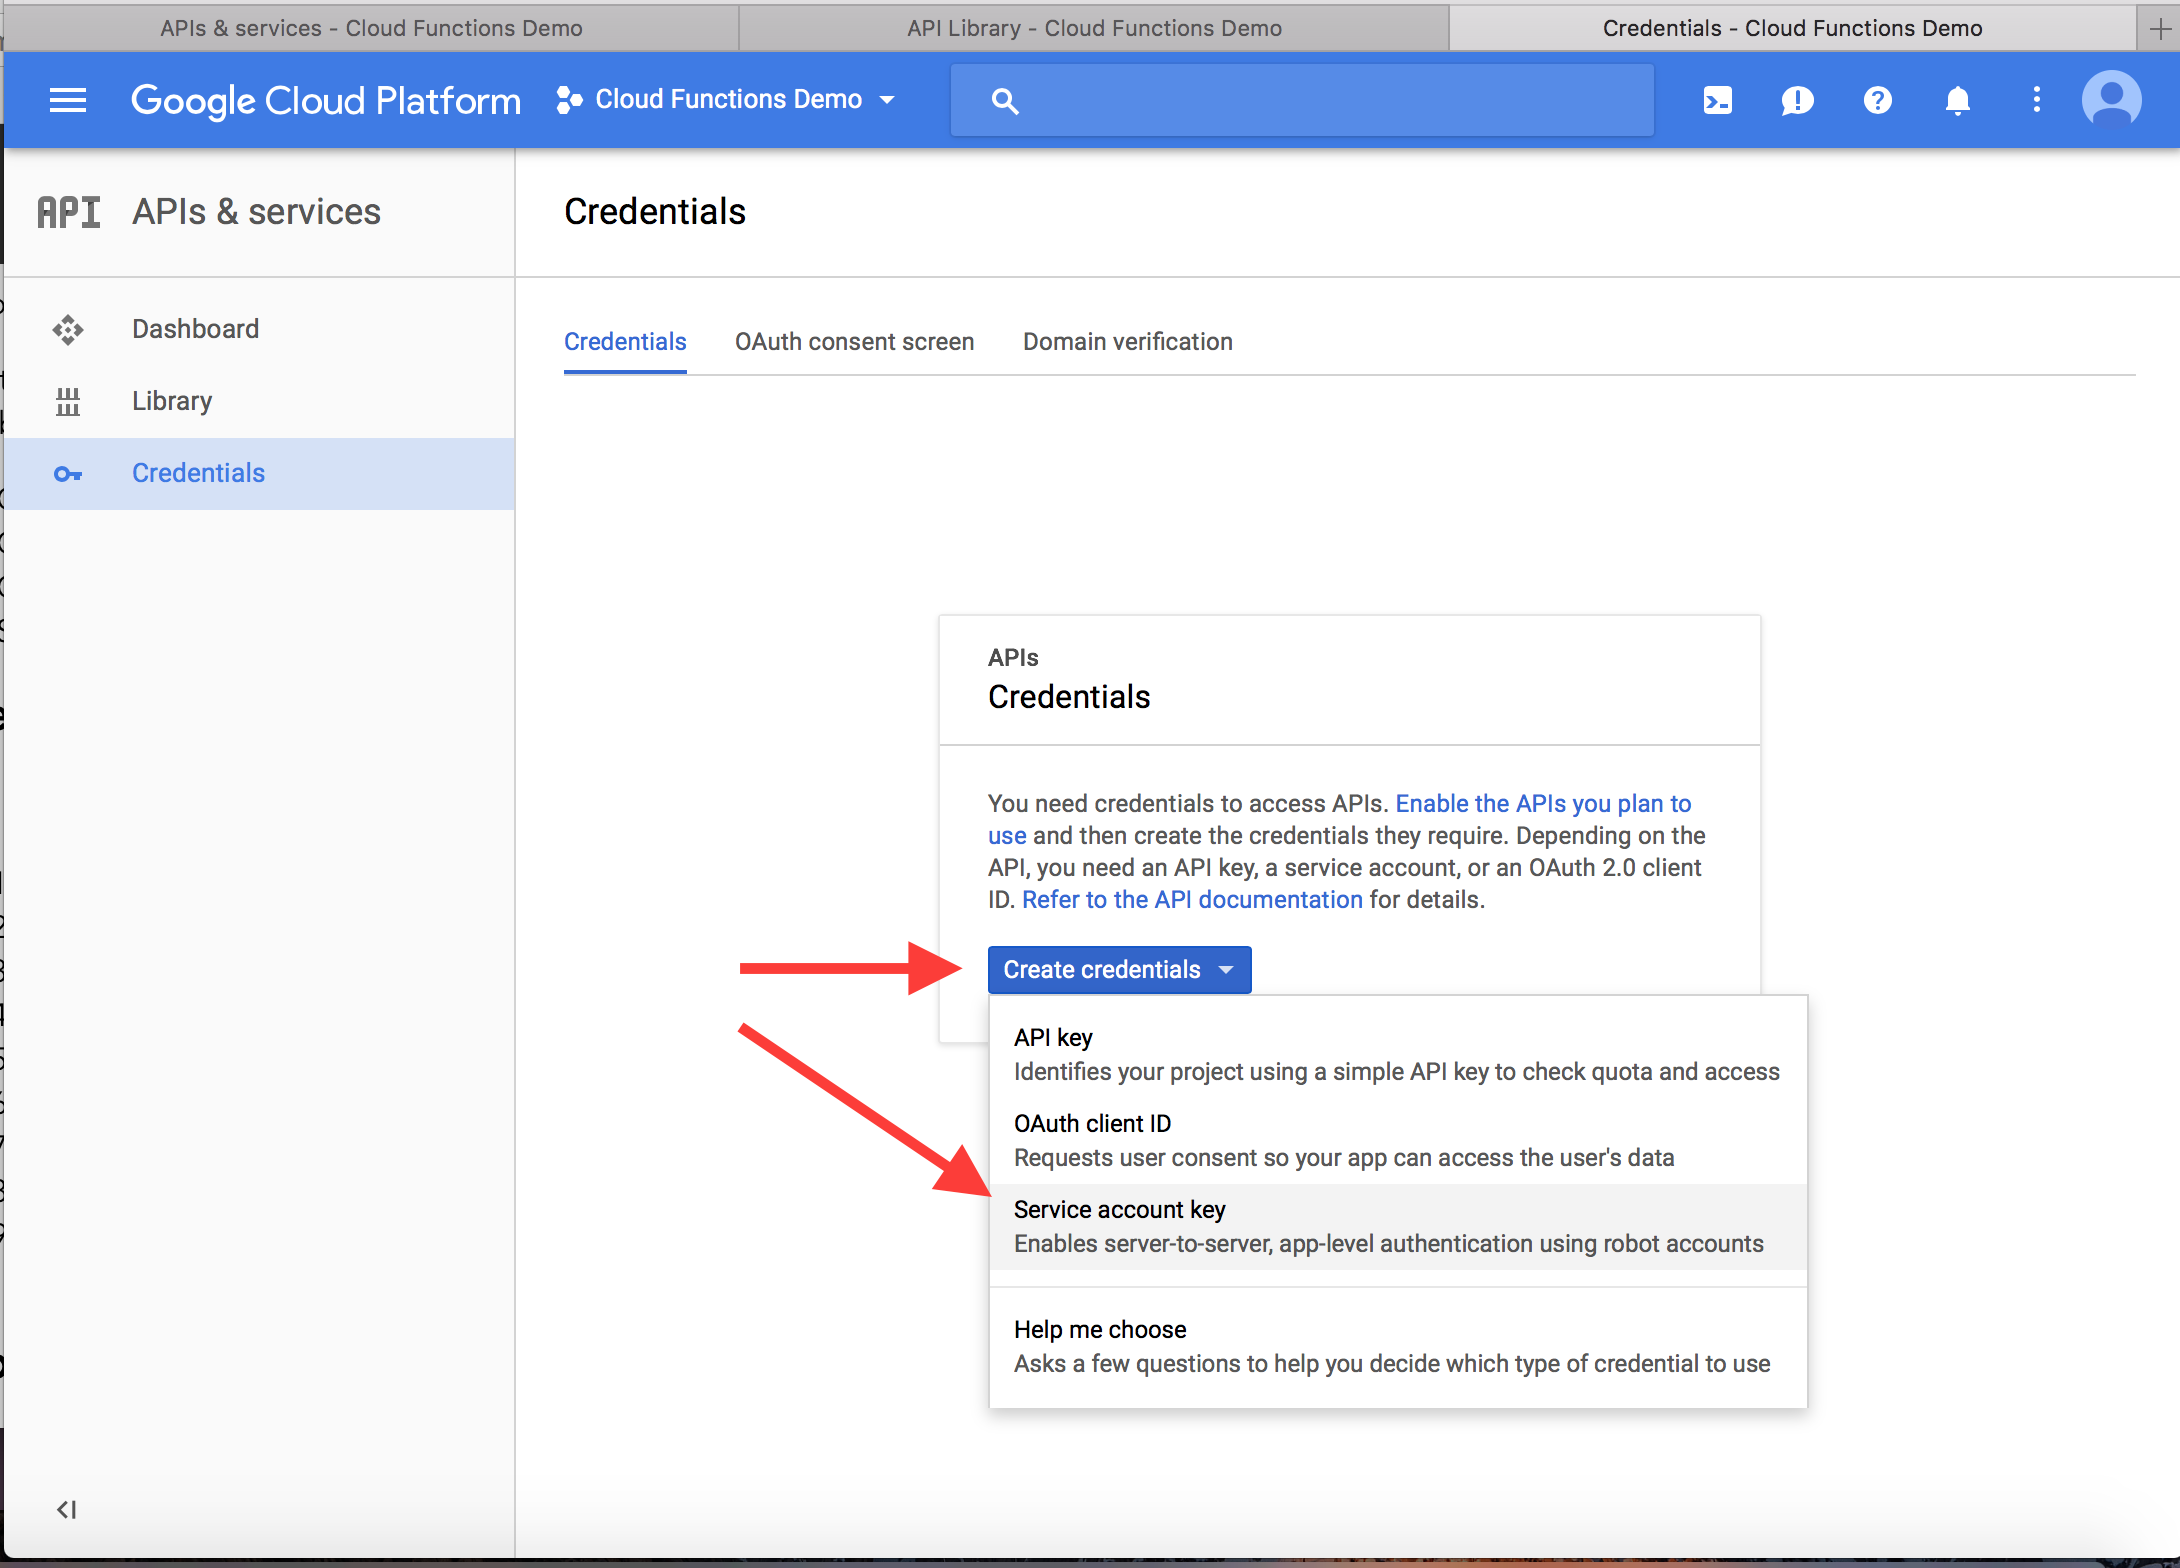
When creating a service account key, choose to create a "New service account". Give it an account name. In the Role selector, choose "Project", then "Owner". This gives you full access in your project. It's more than you should use for production, but it will be easier for the quickstart. Finally, choose a JSON key type, then hit Create to download the credentials to your machine.
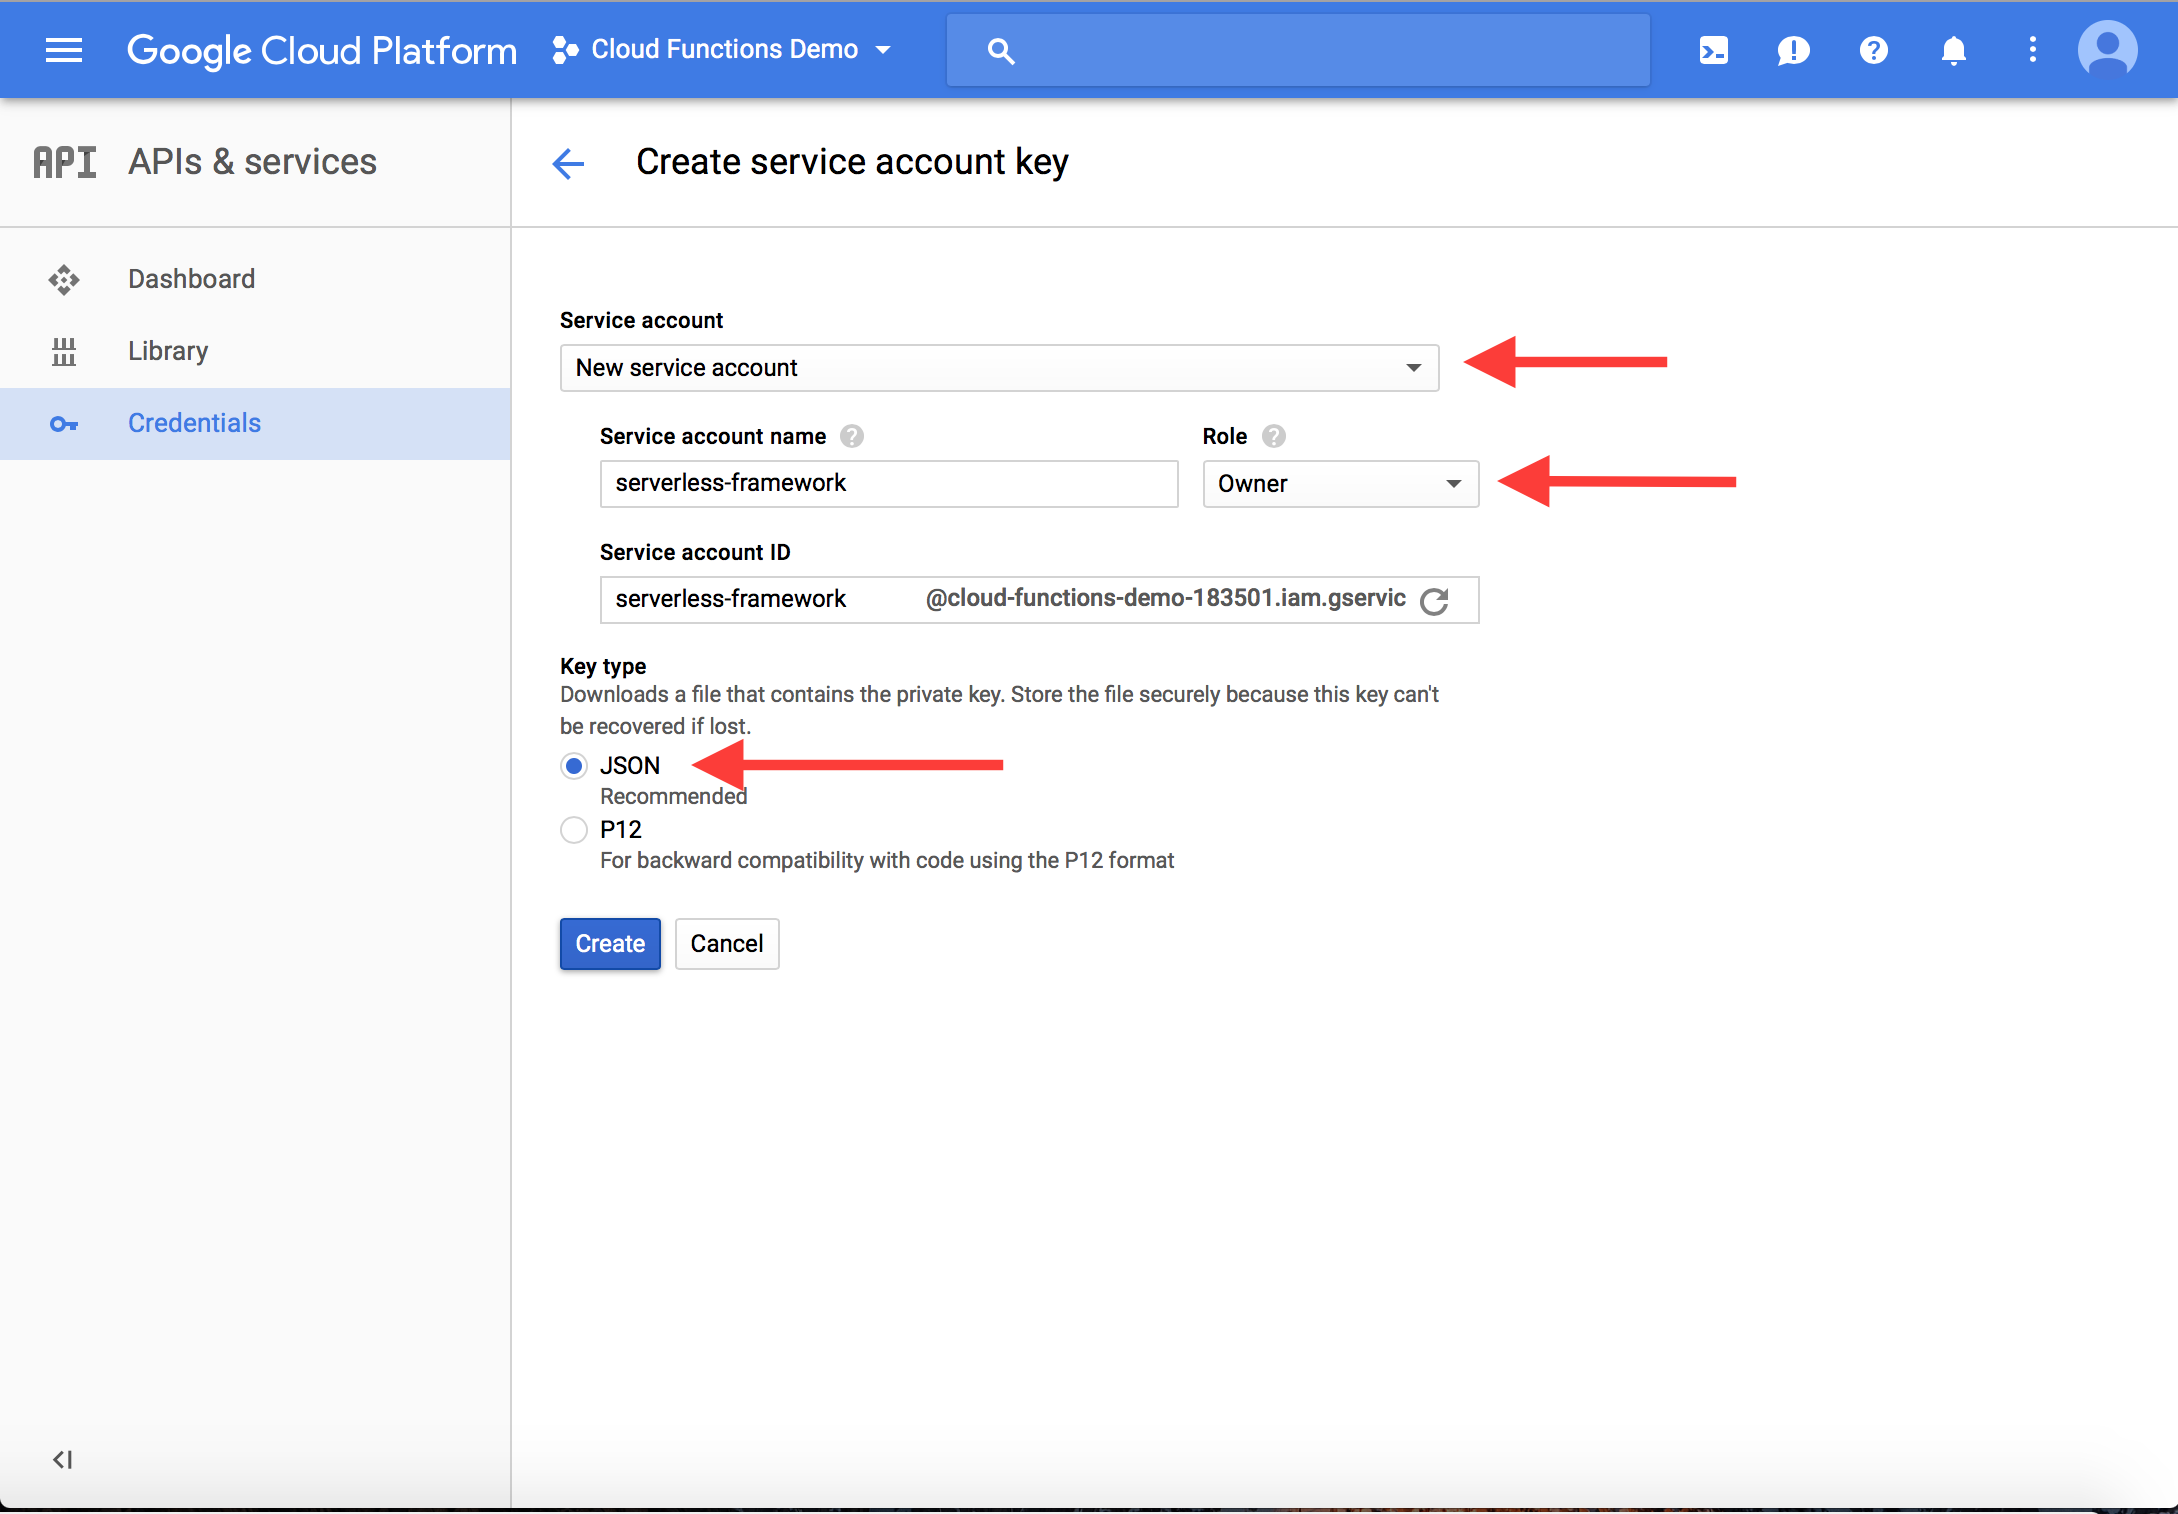
Once the credentials are on your machine, move them to ~/.gcloud/keyfile.json. You'll need to refer to this path in your Serverless service.
Deploying a Simple Function
At this point, you should have a Google Cloud Platform credentials file located at ~/.gcloud/keyfile.json for a service account that has enabled the Google Cloud Functions API and the Google Cloud Deployment Manager API. You should also have a Project Id. If you don't have either of these, read the previous section.
Now, let's deploy a simple function to Google Cloud Functions. First, make sure you have the Serverless Framework installed:
$ npm install -g serverless
Then, let's create a Serverless service using the Google Cloud Functions template, then change into that directory and install dependencies:
$ serverless create --template google-nodejs -p test-project
... log output ...

$ cd test-project && npm install
... log output ...
Now, open up the index.js file. You'll see two functions that are exported http and event. These represent the two types of triggers for Google Cloud Functions. An HTTP trigger is one triggered via an HTTP request to a particular URL, while an event trigger is one triggered from the various event source (Google Pub/Sub, Google Storage, or others). You can check the docs for additional information on the trigger types.
For now, we're just going to use the HTTP trigger. Remove the event function so your index.js looks as follows:
// index.js

'use strict';

exports.http = (request, response) => {
  response.status(200).send('Hello World!');
};
The HTTP function signature is very similar to an Express.js handler -- there's a request object with information about the request, and a response object that you'll use to respond. For now, our function will just return `Hello World!' with a 200 status code.
We can cut down some of the configuration in the serverless.yml file since we're doing a simple function. Edit your serverless.yml so it looks as follows:
# serverless.yml

service: test-project

provider:
  name: google
  runtime: nodejs
  project: cloud-functions-demo-183501
  credentials: ~/.gcloud/keyfile.json

plugins:
  - serverless-google-cloudfunctions

functions:
  http:
    handler: http
    events:
      - http: http
Note: You'll need to change the
projectvalue under theproviderblock so it matches your Project Id. If you don't know it, you can find it in theproject_idkey in your credentials file at~/.gcloud/keyfile.json.
This file is pretty simple. We're deploying a NodeJS function to Google under our project. There's a single function, http, whose handler is the exported http function in index.js. Finally, this will be invoked by an HTTP event at /http.
Let's deploy our function and test it out! Run serverless deploy to send it up.
$ sls deploy

Serverless: Packaging service...

 <snip>

Serverless: Done...

Service Information
service: test-project
project: cloud-functions-demo-183501
stage: dev
region: us-central1

Deployed functions
http
  https://us-central1-cloud-functions-demo-183501.cloudfunctions.net/http
After the deploy is successful, Serverless will show information about your service. This includes the endpoint where you can invoke your function. Let's invoke it using curl:
$ curl https://us-central1-cloud-functions-demo-183501.cloudfunctions.net/http
$ Hello World!
Cool! We got our response back. Let's look at a few more things before moving on.
The request object will have some useful properties just like a normal web request. This includes the HTTP verb (request.method), the request body (request.body), and query parameters (request.query).
To see this, let's play around with the query parameters. Edit your index.js to log the request.query before returning a response:
// index.js

'use strict';

exports.http = (request, response) => {
  console.log(request.query);
  response.status(200).send('Hello World!');
};
Redeploy your function with serverless deploy. Once that's done, call it with curl and add some query parameters:
$ curl -G https://us-central1-cloud-func83501.cloudfunctions.net/http --data-urlencode "name=Alex" --data-urlencode "age=29"
$ Hello World!
We didn't change our response, so we still get "Hello World!". We can use Serverless to check our logs to see our query parameters:
$ serverless logs --function http
2017-10-20T12:38:26.487050893Z: Function execution took 201 ms, finished with status code: 200
2017-10-20T12:38:26.396Z: { name: 'Alex', age: '29' }
2017-10-20T12:38:26.287081091Z: Function execution started
Cool! We get some information about the execution, and we're also able to see anything we logged within function. In this case, we see the two parameters -- name and age -- in our HTTP request.
With these basics in hand, it's time to move on to a more advanced example.
Building an Image Recognition Endpoint
Let's build something fun. Google Cloud Platform has the Google Vision API which can examine an image and provide details on what it contains. We're going to build an endpoint that takes in an image URI as a query parameter and returns a list of labels about the image's contents.
First, we'll need to enable the Google Vision API for our project. Go back to the API Dashboard and click Enable APIs and Services. Find the Google Vision API and hit Enable.
Next, we install the SDK for the Vision API into our project:
$ npm install --save @google-cloud/vision
Then, let's adjust our HTTP handler. The Vision API accepts a URI to a publicly-accessible image. Our handler will look for a uri query parameter with our request, then send that image URI to the Vision API:
// index.js

'use strict';

const vision = require('@google-cloud/vision')();

exports.http = (request, response) => {
  const uri = request.query.uri;
  if (uri == null) {
    response.status(400).json({ error: "Must include a 'uri' query parameter." });
  };
  const image = {
    source: {
      imageUri: uri
    }
  };
  vision.labelDetection(image)
    .then((results) => {
      const annotations = results[0].labelAnnotations;
      const labels = annotations.map(a => a.description);
      const resp = {
        image: uri,
        labels
      };
      response.status(200).json(resp);
    })
    .catch((err) => {
      console.log(err);
      response.status(200).send(err)
    });
};
The response from the Vision API will include an array of labelAnnotations, which are general descriptions of what is in the image. We'll pull out the descriptions from those labels and return them in a JSON response to the client.
Deploy your updated handler code with serverless deploy. Then, let's try it out with some images!
I went to Unsplash to find some cool images. Here's a festive one of some pumpkins:

Credit to Donna on Unsplash
Let's send it to our endpoint. I'm going to pipe the response through jq, which is a utility for interacting with JSON in the terminal:
$ export URI=https://user-images.githubusercontent.com/6509926/31823039-59eb94c6-b570-11e7-82c7-69d7f2e7cc5e.jpg
$ curl -G https://us-central1-cloud-functions-demo-183501.cloudfunctions.net/http --data-urlencode "uri=$URI" | jq "."
{
  "image": "https://user-images.githubusercontent.com/6509926/31823039-59eb94c6-b570-11e7-82c7-69d7f2e7cc5e.jpg",
  "labels": [
    "winter squash",
    "pumpkin",
    "cucurbita",
    "calabaza",
    "vegetable",
    "gourd",
    "local food",
    "cucumber gourd and melon family",
    "squash",
    "produce"
  ]
}
Neat! It knows that I've sent it some pumpkins.
Let's try one more, with everyone's favorite example:

$ export URI=https://user-images.githubusercontent.com/6509926/31823235-0ff6e928-b571-11e7-9671-de399f4f5165.png
$ curl -G https://us-central1-cloud-functions-demo-183501.cloudfunctions.net/http --data-urlencode "uri=$URI" | jq "."
{
  "image": "https://user-images.githubusercontent.com/6509926/31823235-0ff6e928-b571-11e7-9671-de399f4f5165.png",
  "labels": [
    "hot dog",
    "frankfurter würstchen",
    "bockwurst",
    "knackwurst",
    "hot dog bun",
    "sausage",
    "vienna sausage",
    "cervelat",
    "kielbasa",
    "fast food"
  ]
}
Sure enough -- it's a hot dog!
Concluding Thoughts on Google Cloud Functions
I had a lot of fun building this. The Google Cloud Platform has a lot of interesting services, and I'm excited to see where the Cloud Functions product goes from here.
In particular, I think Google Cloud Platform has some really great data stores for the Serverless world. Firebase was a groundbreaking product when it released a few years ago, and the new Firestore database looks like a great option -- NoSQL but with a more flexible query pattern, more similar to MongoDB than DynamoDB. For SQL lovers out there (like me!), Cloud Spanner is an awesome, powerful product.
Additionally, GCP has some great supporting services as well. The machine learning services like the Vision API and the Natural Language API. There are also some amazing data processing products like BigQuery, Cloud Dataflow, and Cloud Pub/Sub.
There are a few areas I'd like to see Cloud Functions mature as well. These are:
- A stable version. Cloud Functions are still in beta -- I'd like to see a stable release before relying on it for production services.
- More language runtimes. Python, please! 🐍. Right now, it's strictly Node.js.
- Better integrations with other services. On the AWS side, we're seeing more and more hooks from AWS services into Lambda. I'd like to see the same in Google.
- API Gateway. The GCF HTTP function feels like a single random endpoint for small demos. Contrast this with AWS, where endpoints feel more composed as a service. I can easily add custom domains to my Lambda endpoints and do HTTP validation and transformations before it hits my Lambda function.
Excited to see where Cloud Functions goes from here!