Chatbots. Maybe you've heard about them recently. Maybe you've even talked to one. But what are chatbots, why are they relevant, and how do you build one? In this post we’ll answer those questions, plus show you how to develop your very own Serverless Facebook Messenger Chatbot. We’ll also explore why serverless architecture and the Serverless Framework are a great fit for this type of application.
What are Chatbots
Imagine that you could pull out your smartphone and send a quick Facebook message to your favorite shoe retailer. Something like “What are the current shoe trends?” Seconds later you receive a message with several pictures of trendy sneakers. Next you respond: “I’m more of a casual person and would like to go with black sneakers in size 10”. Ping. You receive another instant message with the shoes you requested and a simple option to buy them. This might sound futuristic, but it's already happening in online retail stores. This is a chatbot. And it's been called “the next big thing” in customer technologies. Chatbots are a great way to enable users to instantly interact with companies in a very familiar format--direct messaging.
Why use the Serverless Framework
If you want to build your own chatbot, first you need the logic for your chatbot (the code), so that it can automatically respond to users who are sending it messages. Traditionally the next steps would be to setup the server; configure it to run as a webserver; install security updates; deploy the code and share the URL with the world. That could be sufficient. But what if your chatbot goes viral and all the traffic causes your server to crash, rendering your bot unresponsive? What should you do? How do you scale it? And who will pay for your servers since your chatbot won’t make any money yet? The solution? The Serverless Framework.
Developing a Serverless Chatbot
Here's how to build a Facebook Messenger chatbot with the Serverless Framework. Note: We’ll use Amazon Web Services (AWS) as our cloud provider of choice. We'll assume that you’ve installed and setup Serverless and your AWS credentials. Take a look at the Serverless docs if you need any help there.
Getting started
We’ll build a chatbot called Quotebot that will send us a quote if we send it a message.
The code
The code we’ll write throughout this tutorial is open source. We’ll share a link at the end so that you can compare your code with the code we’ve implemented and see how everything works together.
Creating our Serverless service
First, you need to create a new Serverless service that will contain all the necessary code and resources for our chatbot. Run the following command to create a new Serverless service based on the aws-nodejs template inside the quotebot directory:
serverless create --template aws-nodejs --path quotebotCreating a new Facebook application
Next, you need to create a new Facebook app. You need to be a Facebook developer to create Facebook applications and interact with the Facebook Open Graph and their ecosystem. Head over to developers.facebook.com and create an account or sign in if you haven’t already. Go to developers.facebook.com/apps and click on “Add a New App”. Skip the wizard that pops up and select “Basic Setup” at the bottom. Set the Display Name to Quotebot and the Contact E-Mail to your E-Mail address. Select a corresponding category (I’ve selected “Communication”) and click on “Create App ID”. The Facebook app for your Quotebot will be created and you'll be redirected to the overview page. Now you need to setup the Facebook product you want to use. Click on “Get Started” in the “Messenger” section. After that click “Get Started” again and you should see the page where you can configure your messenger integration. That’s all you need to do for now. Let’s go back to your Serverless service.
Creating a webhook
Facebook Messenger communicates with you through a webhook. Your webhook is basically an API endpoint that the messenger will send HTTP requests to. Open up the serverless.yml file and modify it slightly. You’ll rename the hello function definition to webhook. You'll also rename the handler property so that it points to the handler.js file and the webhook function. Then you’ll add two http events to the events definition. They’re both accessible with the help of the webhook path. One via the GET method and the other via POST. Our serverless.yml code should look something like this:
service: quotebot

provider:
  name: aws
  runtime: nodejs4.3

functions:
  webhook:
    handler: handler.webhook
    events:
      - http:
          path: webook
          method: GET
          integration: lambda
      - http:
          path: webook
          method: POST
          integration: lambda
Now you need to update your handler.js file. You'll implement a way to respond to GET requests that are sent to our webhook. You’ll use this functionality so that Facebook can verify that you’re the owner and operator of the webhook. Basically, you decide on a token that only you know which you’ll send from Facebook to your webhook. Open up the handler.js file and update it with the following code:
'use strict';

// Your first function handler
module.exports.webhook = (event, context, callback) => {
  if (event.method === 'GET') {
    // facebook app verification
    if (event.query['hub.verify_token'] === 'STRONGTOKEN' && event.query['hub.challenge']) {
      return callback(null, parseInt(event.query['hub.challenge']));
    } else {
      return callback('Invalid token');
    }
  }
};
Verify that the request that was sent to your webhook is a GET request. If this is the case, check whether the token Facebook sent you is the one you've chosen. If this is the case, you’ll send the challenge code that was sent by Facebook alongside this request back to them. Otherwise, you’ll get an error message. Note: You should replace “STRONGTOKEN” with a really strong token if you deploy a chatbot in the wild. Deploy your Serverless service by running:
serverless deployYou should see the API endpoints in your terminal. Copy and paste the link of the GET endpoint.
Verifying your webhook from Facebook
Now it's time to verify that you’re the owner of your webhook and awesome Quotebot. Go back to the Facebook Messenger app you previously created and select the “Messenger” product on the left-hand side. Go to “Settings” underneath it. Click on “Setup Webhooks” in the “Webhooks” section. Paste the copied GET endpoint URL into the Callback URL field and enter your token (e.g. STRONGTOKEN). Just select all the Subscription Fields for now and then click on “Verify and Save”. Facebook will now send a GET request to your webhook and verify that you’re the owner of this Chatbot. You should see a green “Completed” message in the “Webhooks” section.
Creating and setting up a Facebook Page
Facebook chatbots need a Facebook Page so they can communicate with a user. Let’s create and setup your Quotebot Page so that it can communicate with your Quotebot Facebook app. Go to https://www.facebook.com/business/products/pages and create a new Facebook Page with the name Quotebot (We’ll choose the same name as your Facebook chatbot app). The settings you choose aren't that important for now. Go back to the Facebook Messenger settings page and hit refresh once you’ve successfully created your Page. Select the recently created “Quotebot” Page in the “Token Generation” section. Click on “OK” in the pop-up window to grant access to your Facebook profile. Facebook will now generate a token that you’ll need to use to connect your chatbot with the corresponding Facebook Page. Copy this token. (Note: the token might contain line breaks so move the mouse down a little bit while selecting it). Open up a terminal and enter this command:
curl -X POST
"https://graph.facebook.com/v2.6/me/subscribed_apps?access_token=<PAGE_ACCESS_TOKEN>"
You’ll need to replace the access_token with the copied access token. Hit "Enter" and you should see a success message. Now everything's in place from the Facebook side. You only need to write your Chatbot's logic and then you can communicate with it.
Writing your Chatbot's logic
First, you need to add the axios npm package to your Serverless service. Create a package.json file in the root of the service with the following content:
{
  "name": "quotebot",
  "version": "0.1.0",
  "description": "A Serverless Chatbot which will send you quotes",
  "scripts": {
    "test": "echo \"Error: no test specified\" && exit 1"
  },
  "author": "",
  "license": "MIT",
  "dependencies": {
    "axios": "^0.14.0"
  }
}
After that run:
npm installto install the axios npm package that you’ll use to perform HTTP POST requests. (You need to send data back to Facebook via Post from your Quotebot). Next, you need to update your handler.js file. Import the axios package at the top of the file so that you can use it to issue HTTP requests:
const axios = require('axios');After that's done, add the following if statement directly under the first if statement you used to verify your chatbot:
if (event.method === 'POST') {
    event.body.entry.map((entry) => {
      entry.messaging.map((messagingItem) => {
        if (messagingItem.message && messagingItem.message.text) {
          const accessToken = '<PAGE_ACCESS_TOKEN>';

          const quotes = [
            'Don\'t cry because it\'s over, smile because it happened. - Dr. Seuss',
            'Be yourself; everyone else is already taken. - Oscar Wilde',
            'Two things are infinite: the universe and human stupidity; and I\'m not sure about the universe. - Albert Einstein',
            'Be who you are and say what you feel, because those who mind don\'t matter, and those who matter don\'t mind. - Bernard M. Baruch',
            'So many books, so little time. - Frank Zappa',
            'A room without books is like a body without a soul. - Marcus Tullius Cicero'
          ];

          const randomQuote = quotes[Math.floor(Math.random() * quotes.length)];

          const url = `https://graph.facebook.com/v2.6/me/messages?access_token=${accessToken}`;

          const payload = {
            recipient: {
              id: messagingItem.sender.id
            },
            message: {
              text: randomQuote
            }
          };

          axios.post(url, payload).then((response) => callback(null, response));
        }
      });
    });
  }
Replace the accessToken variable with the Page access token you also used to connect your Facebook Chatbot app to the Page. Let’s go through the source code to get a better understanding of what’s happening here. First, verify that the incoming request method is a POST request. This is the case if someone interacts with your chatbot. Next, look into the data you get from Facebook--basically the message the user has entered. Then, define an array of quotes and pick a random quote from that selection. This quote is stored in the randomQuote variable. Finally, prepare the response you’ll send to Facebook. You’ll send your random quote back to Facebook by issuing a HTTP POST request. The payload also includes the recipient ID (the ID of the user who started the conversation) so that you can dispatch the message to the correct user. That’s it. Run:
serverless deployonce again to deploy the Quotebot!
Testing the Quotebot
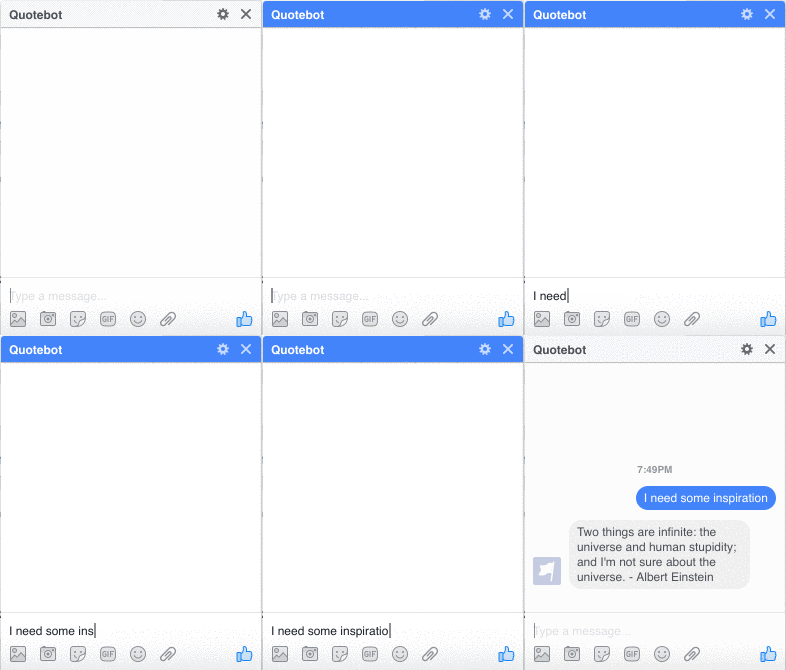
After all this hard work you could use some inspiration! Open up the Quotebot Page and click on “Message” to compose a new message. Type something and hit “Enter” as if you're interacting with a human being. Quotebot will reply with an inspirational quote from your array of quotes. But it won’t end here. You could also use Quotebot from your smartphone's Messenger app. Just open the Facebook Messenger app, select the conversation with Quotebot and send a new message. You’ll immediately get an awesome quote as a response.
Quotebot source code
Take a look at our “Quotebot” repository to see all the code we wrote during this blog post: https://github.com/pmuens/quotebot/.
Conclusion
You’ve just created your very first Facebook Chatbot that will inspire you on demand with great quotes! Your chatbot can scale infinitely without you doing anything, and you’ll only be charged when people interact with it. This is just the beginning. Chatbots are becoming more and more popular, and the Serverless Framework is a great fit to architect an infinitely scalable Chatbot with very low operating costs. Want to learn more about the Serverless revolution? You can read more about Serverless and the Serverless Framework on our website, Medium or in our Forum.


