In this post, I'll show you how to put multiple Serverless services on the same domain name. This is the most requested issue in the Serverless repo right now but is a tricky feature to implement directly within the Framework.
Using the power of Serverless and the serverless-domain-manager plugin, we can use API Gateway's base path mappings to handle this. Follow the instructions below to deploy your two services to the same domain.
Addendum: Many users asked about how to deploy to different domains based on the stage, e.g. staging-api.mycompany.com when deploying to staging. I've added a section on Working with multiple stages below.
If you already have your own services set up and just want the simple instructions, skip to the TL;DR section below.
Getting Started
To get started, you'll need the Serverless Framework installed.
You should also have your desired domain name registered through AWS. Read the documentation on that here. You should also register a certificate for that domain through the AWS Certificate Manager. If you need help with that, read the Getting a certificate for your domain section of my previous post on using API Gateway with Serverless.
Deploying your two services
Before we dive it, let's discuss exactly what we're trying to build. Imagine you have an e-commerce store which is a single-page application that consumes a backend REST API. Your REST API is hosted at api.mycompany.com, and you have two services: users and products.
You would like all users requests to be accessed at api.mycompany.com/users while all products requests would be accessed at api.mycompany.com/products. Further, you would like to separate these two services so they could be deployed independently -- changes to a products endpoint wouldn't require a redeploy of all users functions as well.
For this example, do the following:
First, create a new directory for your application:
$ mkdir api-gateway-application
$ cd api-gateway-application
Then, create a directory for your users service:
$ mkdir users-service
$ cd users-service
In your users-service directory, add the following serverless.yml file:
# serverless.yml

service: users-service

provider:
  name: aws
  runtime: python3.6
  stage: dev
  region: us-east-1
  environment:
    SERVICE_NAME: ${self:service}

functions:
  hello:
    handler: handler.hello
    events:
      - http: GET hello
Then add the following as handler.py:
# handler.py

import os

def hello(event, context):
    response = {
        "statusCode": 200,
        "body": "Hello from the {}!".format(os.environ.get('SERVICE_NAME'))
    }

    return response
This is a super simple service with a single endpoint (/hello) that will return the name of the service. To test it, deploy the service:
$ sls deploy
...
Service Information
service: users-service
stage: dev
region: us-east-1
stack: users-service-dev
api keys:
  None
endpoints:
  GET - https://n0benf6jn4.execute-api.us-east-1.amazonaws.com/dev/hello
functions:
  hello: users-service-dev-hello
Copy and paste the endpoint into your browser, and you should see the following message:
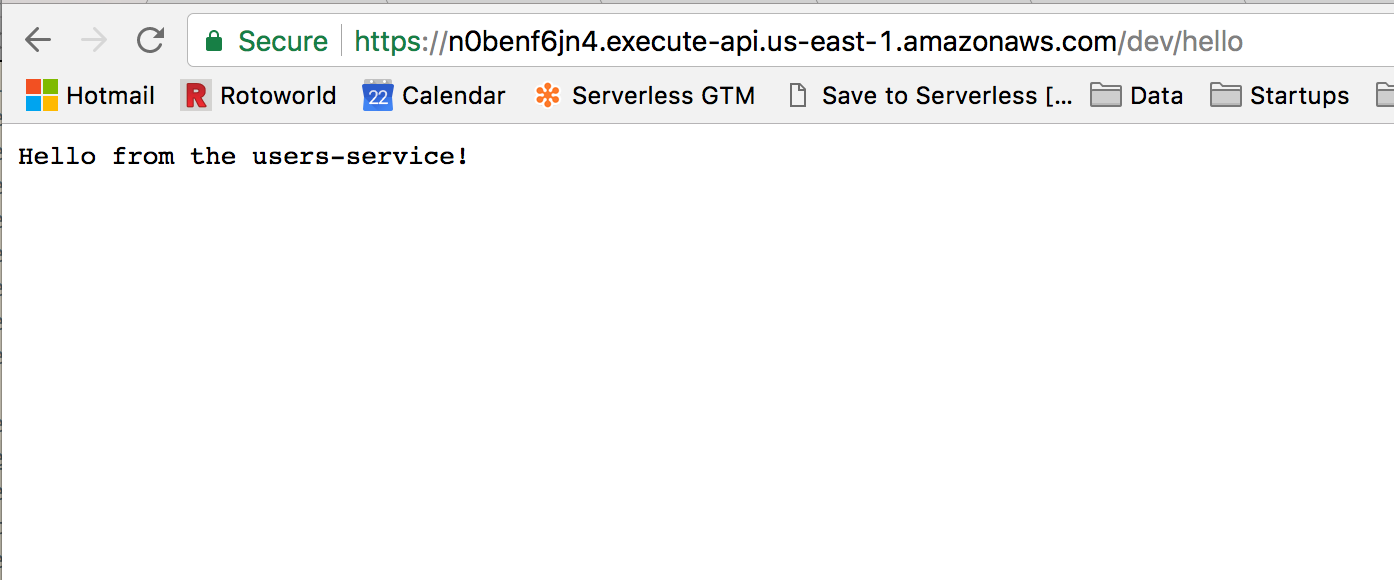
As you can see, the URL isn't very friendly. We'll fix that during this walkthrough. To finish our setup, let's make a products service as well. Move up a level in your directory structure, then copy the users-service into a products-service directory:
$ cd ..
$ cp -r users-service/ products-service
$ cd products-service
Then edit the name of the service in your products-service serverless.yml:
# serverless.yml

service: products-service

provider:
  name: aws
  runtime: python3.6
  stage: dev
  region: us-east-1
  environment:
    SERVICE_NAME: ${self:service}

functions:
  hello:
    handler: handler.hello
    events:
      - http: GET hello
Run sls deploy to deploy the products-service, and make sure it's working in your browser:
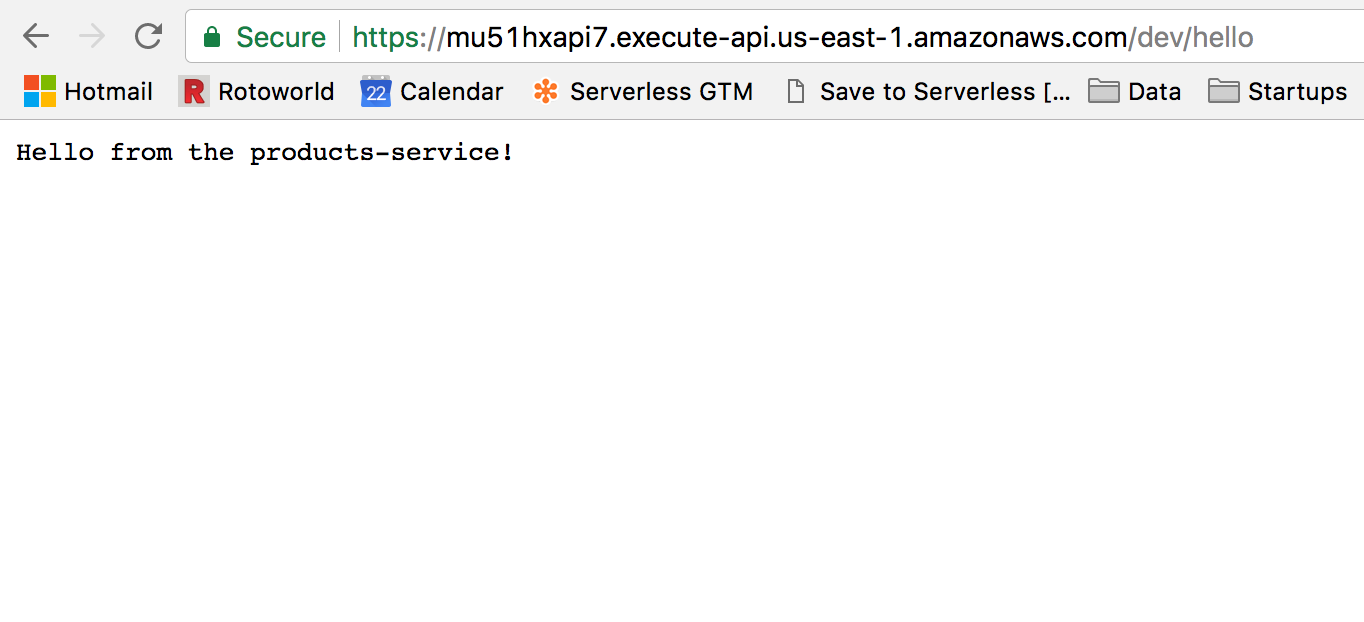
Again, it's an ugly URL, which we're going to change soon.
Adding your services to your custom domain
Now that we have our two services set up, let's add them to a custom domain. You should still be in your products-service. Let's install the serverless-domain-manager plugin:
$ npm init -f
$ npm install serverless-domain-manager
Then add the configuration to your serverless.yml:
# serverless.yml

service: products-service

provider:
  name: aws
  runtime: python3.6
  stage: dev
  region: us-east-1
  environment:
    SERVICE_NAME: ${self:service}

functions:
  hello:
    handler: handler.hello
    events:
      - http: GET hello

plugins:
  - serverless-domain-manager

custom:
  customDomain:
    domainName: 'api.mycompany.com' # Change this to your domain.
    basePath: 'products' # This will be prefixed to all routes
    stage: ${self:provider.stage}
    createRoute53Record: true
We've added two sections to the serverless.yml. First, we registered the serverless-domain-manager in the plugins block. Then, we configured the plugin via the customDomain section of the custom block.
Note the basePath attribute that we're configuring. This will be prefixed to every route in our products-service. Thus, our route that is registered as /hello will actually be located at products/hello.
If you haven't previously registered this domain with API Gateway, you'll need to register it:
$ serverless create_domain
Serverless: Domain was created, may take up to 40 mins to be initialized
As the output notes, it can take up to 40 minutes to provision this in AWS. This is a one-time setup cost.
Once your domain is set up, deploy your service with sls deploy. Once the deploy is done, your endpoint will be available at api.mycompany.com/products/hello:
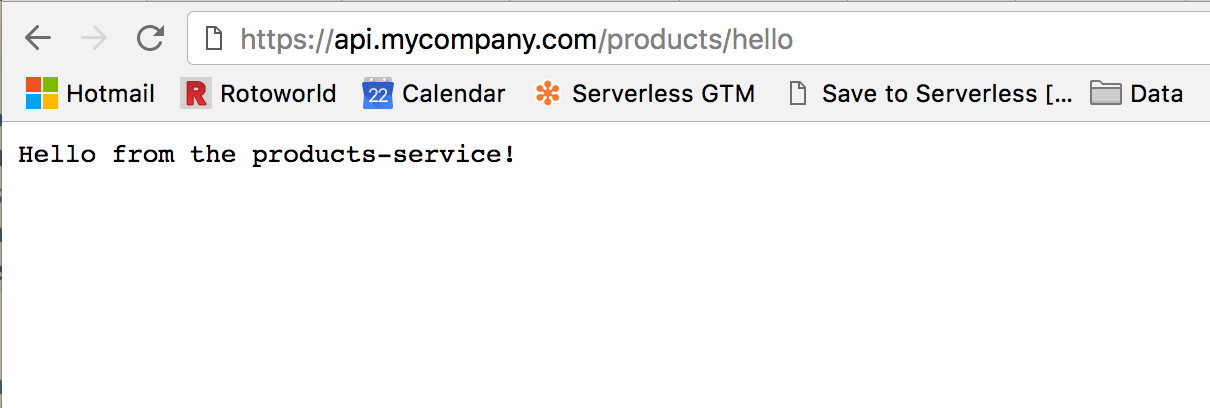
That's a much cleaner URL!
Let's do the same with our users service. Change into that directory:
$ cd ../users-service
and follow the same steps as above. Install the serverless-domain-manager plugin:
$ npm init -f
$ npm install serverless-domain-manager
and add the config to your serverless.yml:
# serverless.yml

service: users-service

provider:
  name: aws
  runtime: python3.6
  stage: dev
  region: us-east-1
  environment:
    SERVICE_NAME: ${self:service}

functions:
  hello:
    handler: handler.hello
    events:
      - http: GET hello

plugins:
  - serverless-domain-manager

custom:
  customDomain:
    domainName: 'api.mycompany.com' # Change this to your domain.
    basePath: 'users' # This will be prefixed to all routes
    stage: ${self:provider.stage}
    createRoute53Record: true
Note that the basePath in this one is users, which will be prefixed to all routes in the users-service.
You don't need to run serverless create_domain again. Because you created the domain already, it is available for any services that want to use it.
Run sls deploy to deploy the users service, then check it in your browser:
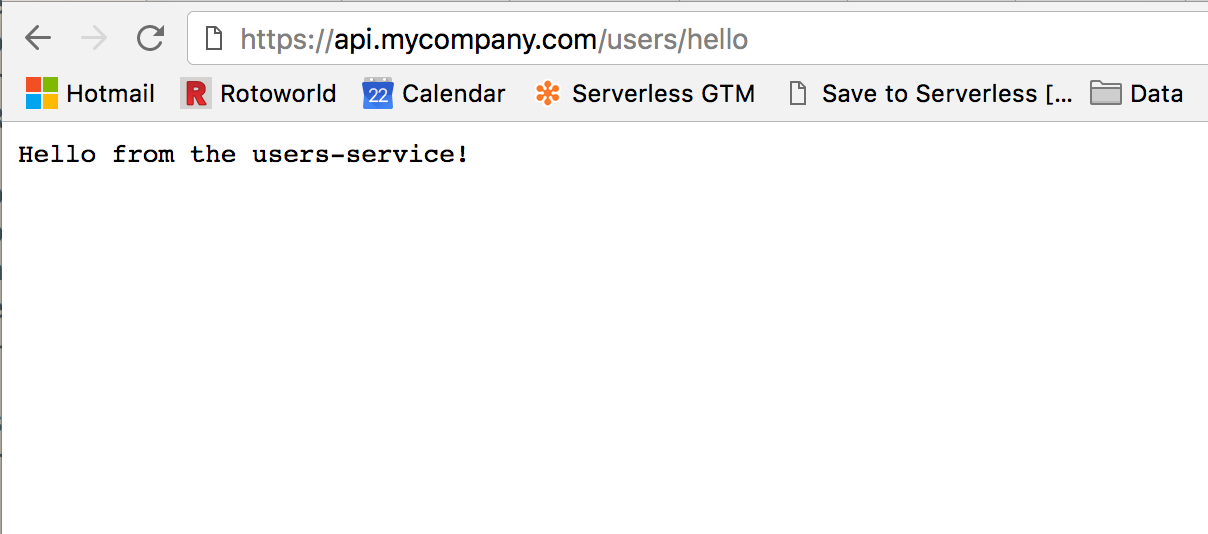
That's it! Now you easily separate your functions into services while still keeping them on the same domain. You're not limited to two services on this domain -- as you add additional services, just use a new basePath to add it to your domain.
Working with multiple stages
Addendum: A few people have asked about how to handle this with multiple stages (prod, staging, dev). I've added this section to show how to structure your project to handle this.
When working with Serverless services, you'll often have multiple stages for your project. In this section, I'll show you how to set up your project to deploy to custom domains for different stages.
To set the scene, let's imagine we have three stages:
prod, which is accessible atapi.mycompany.com;staging, which is accessible atstaging-api.mycompany.com; anddev, which is accessible atdev-api.mycompany.com.
The first thing you need to do is get certificates for each of these domains in Amazon Certificate Manager. Please read the Getting a certificate for your domain section of my previous post on using API Gateway with Serverless.
Once you've done that, use the following config for your custom block in serverless.yml:
custom:
  stage: ${opt:stage, self:provider.stage}
  domains:
    prod: api.mycompany.com
    staging: staging-api.mycompany.com
    dev: dev-api.mycompany.com

  customDomain:
    basePath: ""
    domainName: ${self:custom.domains.${self:custom.stage}}
    stage: "${self:custom.stage}"
    createRoute53Record: true
Pay particular attention to this line:
domainName: ${self:custom.domains.${self:custom.stage}}"
We're using the Serverless Framework's powerful variable system to infer the domain name based on the stage. I've set up my three stages in the domains block of the custom section. This will use my given stage to determine which domain to use.
Once this is set up, you'll need to create your custom domain for each of your stages. This is a one-time setup step. If you use the stages I gave above, you would run:
$ sls create_domain --stage prod
$ sls create_domain --stage staging
$ sls create_domain --stage dev
Once your domains are set up, you can deploy to your proper stages! Use sls deploy --stage prod to deploy to api.mycompany.com and the other stages to deploy to their respective domains.
TL;DR
If you already have multiple services set up and are looking to add them to the same domain, follow these steps.
Before you begin, you'll need to get a certificate for your domain with the AWS Certificate Manager and register your domain with API Gateway. To do that, follow the steps in my previous post on using a custom domain with API Gateway and Serverless. Stop after the step that says sls create_domain.
In each service, install the serverless-domain-manager plugin:
$ npm install serverless-domain-manager
Then, add the following configuration to your serverless.yml:
# serverless.yml

plugins:
  - serverless-domain-manager

custom:
  customDomain:
    domainName: 'api.mycompany.com' # Change this to your domain.
    basePath: 'myprefix' # This will be prefixed to all routes
    stage: ${self:provider.stage}
    createRoute53Record: true
Make sure you change the domainName value to the domain name you want to use. Change the basePath value to the prefix you want for your routes in that service. For example, if you want your routes to start with /products/, the basePath value should be products.
Then, run sls deploy to get your service deployed to your custom domain with a base path!